Table of Contents
Serverless technology is getting more popular by the day. More and more people are starting to experiment with it and learn for which use cases it can add value. In this blog post I share an example of what a fully Serverless workflow can achieve.
For a while now I’ve been curious how one would implement a payment workflow on a website. I was aware that platforms like Stripe, Adyen and Mollie exist, but I never knew how much work would be required to set up a fully functioning workflow. I therefore decided to give it a try using nothing but Serverless technology.
There is no specific reason I built the workflow using Mollie - any other provider would have worked as well. From a quick glance at their documentation, the workflow would be pretty similar.
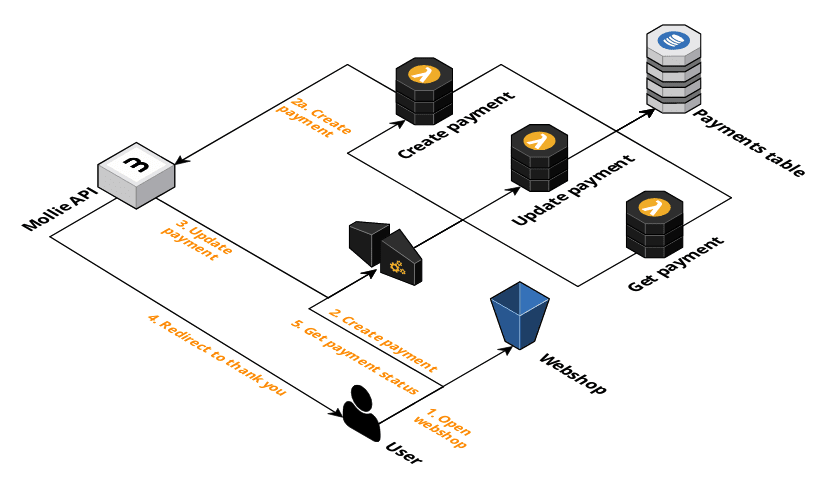
In this blog post I’ll go through the exact workflow that I built in AWS using S3, API Gateway, Lambda and DynamoDB. To see the full source code and get the application running yourself, I recommend checking out my GitHub Repository with the fully functioning code. The following image depicts the full architecture and workflow steps.

The workflow
If you ever bought something on the internet, you’re probably familiar with the typical payment flow. After you click the “Pay” button in the webshop, your browser redirects to another website where you can input your information to make a payment. After you entered your information, you are redirected back to the webshop greeted by some “Payment received!” message.
The image above shows more in-depth which steps are part of this flow. Let’s go through these steps one-by-one.
- The first step is to open up the webshop page that is about to redirect you to the payment provider. In our case this website is hosted in an S3 bucket. The page displayed shows a list of articles and a “Buy” button.
After clicking this button the browser executes a POST request to our payments API. This endpoint first registers the payment at Mollie after which it stores the started payment session in the DynamoDB table. The API response then tells the browser to redirect to the checkout URL which we received from Mollie.
- We use the Mollie API to register the payment. As part of creating the payment we also provide the webhook URL where Mollie can send updates regarding the payment, and the URL where to redirect to after the payment was finalized (the “thank you” page). The Mollie documentation includes the full Create Payment API reference.
After the user entered their payment details, Mollie calls our API to send us the latest information. We update the current payment information in DynamoDB to reflect the correct status (paid, cancelled, etc.).
After the user finalized the payment, Mollie redirects the user back to the “thank you” page on our webshop. The redirect URL contains the payment’s ID.
Finally, on the “thank you” page the browser executes an XHR request to fetch the latest payment information from our API based on the ID in the redirect URL. This is how we tell the user whether the payment was successful or not.
You can find more information about the Mollie Payment flow in their documentation.
Things to keep in mind
I took many, many shortcuts when building this workflow. The application only contains the minimal steps required to get a fully functioning workflow up and running. The application is far from production-ready. Here are some things to keep in mind when you want to take this application to the next level:
- Important: I’m storing the Mollie API credentials as plaintext. The API key is therefore visible to anyone with access to your code or your AWS environment. Use a solution such as AWS Secrets Manager to store and retrieve the API key securely.
- The workflow assumes the latest payment information is available when the browser opens the “thank you” page. In reality, this is an asynchronous process - Mollie sends an update to our Payments API when an update is available and when their systems can forward this information. Updates will be delayed when a credit card verification takes more time. Mollie may also give delayed responses if their queues are filling up. Our API may also have an issue and not properly process the payment update - luckily, Mollie retries until our API returns a 200 status code. Keep this all in mind when designing your thank you page: the database’s payment status may still be “pending”.
- For simplicity, the only entity I work with in this workflow is a “payment”. In reality you’ll want to separate the lifecycle of your payment from the lifecycle of the actual order.
- The code assumes everything works as expected; only the happy path is implemented. You’ll want to add additional checks to account for unexpected API responses and build in retry mechanisms.
Give it a try
There is no such thing as too many Serverless example workflows. You learn the most by doing, so I would recommend giving this a try for yourself. To deploy this workflow, check out my GitHub Repository with instructions on how to get started.