Table of Contents
Nomad is a distributed, multi-datacenter scheduler for containers, virtual machines and more. It’s a tool from Hashicorp, the company that also brings us Consul, a service-discovery tool that allows you to register and discover services. With the latest big release of Nomad (version 0.4), integration with Consul is improved which promises to significantly simplify the creation of a (multi-datacenter) Nomad cluster. You can read more about this release on Hashicorp’s blog.
In this blog post I’ll put that promise to the test by setting up a multi-datacenter Nomad cluster. First though, a word of caution on two different topics;
- The setup will not be secure. In order for our two datacenters to communicate, we will use the public Internet. To keep this post relatively simple, I won’t bother with setting up any security mechanisms (though these are available); firewalls for example will be completely disabled. Some services and processes will therefore be exposed to the outside world. Keep in mind that for production purposes, you will probably want to route the traffic through a VPN connection so that you don’t need WAN communication.
- Complete high-availability is out scope. Though Nomad will be setup with three different nodes to provide high-availability, we will set up two separate single-node Consul clusters. Again, this is to keep the architecture as simple as possible.
I am going to assume at least some basic knowledge about Nomad and Consul. I would at least suggest following the introduction guides for both tools (click for Nomad and Consul).
Architecture setup
Let’s begin with some background info and quick explanation of what exactly we will setup. Both tools have the notion of servers and clients. Servers are the brains of the clusters. Nomad servers schedule tasks to clients whereas the Consul servers maintains cluster state and can tell other nodes or containers where to find services.
For Nomad, the clients are where the Docker containers are actually run. In Consul, the clients are mainly there for other services to register themselves and query for the locations of other services. To keep our setup simple, we won’t be creating any Consul clients as we can query the servers for the information we need. We will be creating two different nodes running Nomad clients and Docker in two different datacenters.
Both Nomad and Consul are datacenter-aware. Nomad in addition is also region aware, where a region can contain multiple datacenters. For Consul, we have to set up a server cluster in every datacenter. For Nomad, we have to set up a server cluster in our single region, where the cluster nodes may exist in different datacenters. This is exactly what we will do in this blog post, so more on that later. The following image should make it more clear.
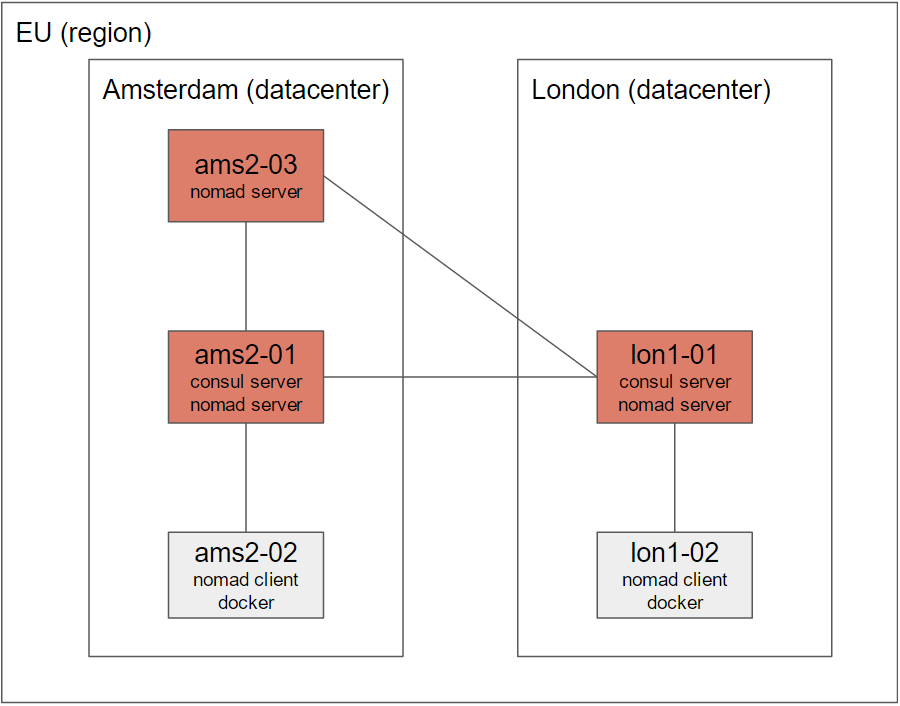
The complete architecture contains 5 nodes in 2 different datacenters (ams2, Amsterdam, and lon1, London) in 1 region (eu, Europe). Both datacenters contain a single-node Consul cluster. As we need only 1 Nomad cluster in the entire region, we will set it up in both datacenters. However, because we need an uneven number to properly set up a cluster, an extra node was added in ams (ams2-03). Finally, both datacenters contain a single “client node” for Nomad which is where the Docker containers will actually run.
All nodes I set up are running CentOS 7.2. Keep this in mind if you are following along using a different OS. I am running these nodes on DigitalOcean, but you can easily following along on another provider such as AWS or Google Cloud. Just be sure to spawn the 5 nodes in two different datacenters, and keep good track of both their public and private IP addresses. Be sure to disable any firewalls.
Checklist
We are going to install the entire setup in three steps:
- Setup 2 Consul servers; one in both datacenters. We will manually connect both Consul servers through the public internet.
- Setup 3 Nomad servers; two in one datacenter, one in the other datacenter. Nomad servers will find their peers through Consul.
- Setup Nomad clients with Docker; one in both datacenters.
Let’s get started!
Installing and configuring Consul servers
SSH into two nodes in two different datacenters. Install Consul using the following commands:
wget https://releases.hashicorp.com/consul/0.6.4/consul_0.6.4_linux_amd64.zip
unzip consul_0.6.4_linux_amd64.zip -d /usr/bin
consul version # 0.6.4
You should now the Consul version which should say 0.6.4 (unless a more recent version is available and you have downloaded that one). This means Consul is succesfully installed. Next, we are going to make our live a bit easier by installing a systemd unit file. This makes it much easier to run Consul in a background process while still being able to easily access its logs. Save the following file to /lib/systemd/system/consul.service.
[Unit]
Description=consul

[Service]
ExecStart=/usr/bin/consul agent -config-dir /etc/consul
KillSignal=SIGINT
This is pretty much the most simple systemd unit file you can create. When used in production I would advice adding dependent services and registering it to a systemd target. As you can see, we specify the /etc/consul directory to contain the configuration file(s). In addition, we use a SIGINT to kill the process as this will have the node gracefully leave the cluster.
Next, let’s specify the configuration for this node in /etc/consul/server.json:
{
  "datacenter": "ams2",
  "data_dir": "/tmp/consul",
  "log_level": "DEBUG",
  "node_name": "ams2-server-01",
  "server": true,
  "bootstrap_expect": 1,
  "client_addr": "0.0.0.0",
  "advertise_addr": "[private_ip_address]",
  "advertise_addr_wan": "[public_ip_address]"
}
Great, so what is going on here? First, we specify the datacenter which in my case is “ams2”, but the name doesn’t matter that much as long as all nodes in the same datacenter use the same name. I am giving the node a logical name and we set the bootstrap_expect property to 1; this is a single-node (and therefore, not highly-available) cluster. We set the clientaddress to 0.0.0.0 as we are going to link the Nomad agents on the other nodes to these Consul instances as well. These nodes will connect to Consul through the private ip address to stay within the datacenter. Be sure to correctly set your public and private IP addresses as this is rather error prone. Double check before you save this file!
Now, perform the exact same steps on your node in the other datacenter. Be sure to replace the datacenter, node_name and advertise properties with the correct values for this node. Start Consul on both servers by issuing:
systemctl start consul
If you want to see the output of the logs, you can run the following command;
journalctl -fu consul
With the journalctl utility you can retrieve the logs generated by systemd. The -f parameter tells it to follow the logs as they are being generated. With -u, you can specify a specific systemd unit to follow. The following command will join both Consul servers; if you keep the logs open on the other node you can see the logs that are being generated as the nodes join.
consul join -wan [public_ip_address_other_server]
Be sure to specify the public ip address of the other server. If joining fails, be sure no firewalls are blocking the connection and check that you are using the correct IP address. We now have a multi-datacenter Consul setup up and running and can test the correct connection by issuing the following command on one of the nodes:
curl localhost:8500/v1/catalog/datacenters
This will show you that the node can also see the other datacenter. Consul does not share services or key/value pairs by default across different datacenters. Even though you can access these values from another datacenter, you will find they are “namespaced” for that specific datacenter. For example, on one node, set a key/value pair and read it back through these command:
curl -X PUT -d 'myvalue' localhost:8500/v1/kv/mykey
curl localhost:8500/v1/kv/mykey # will show you the key
Now, on the other node, you will see that the next first command will not show the value, but the second will. Replace the id_other_datacenter value with the value you used in the /etc/consul/server.json file.
curl localhost:8500/v1/kv/mykey # nothing is returned

curl localhost:8500/v1/kv/mykey?dc=[id_other_datacenter] # will again show you the key
Looks like we got Consul up and running and connected on two different datacenters! Next, let’s move on to Nomad.
Installing and configuring Nomad servers
SSH into one additional node in one of your datacenters; we will now install a three-node Nomad Server cluster on the two nodes configured with Consul and the extra one. Begin by installing the (at the time of writing) latest version of Nomad.
wget https://releases.hashicorp.com/nomad/0.4.1/nomad_0.4.1_linux_amd64.zip
unzip nomad_0.4.1_linux_amd64.zip -d /usr/bin
nomad version # 0.4.1
Again, let’s make our life a little easier by creating a systemd unit file. Save the following to /lib/systemd/system/nomad.service.
[Unit]
Description=nomad

[Service]
ExecStart=/usr/bin/nomad agent -config /etc/nomad
KillSignal=SIGTERM
We can now specify the Nomad configuration in /etc/nomad/server.hcl.
log_level = "DEBUG"
data_dir = "/tmp/nomad"
bind_addr = "0.0.0.0"

region = "eu"

# be sure to change the datacenter for your different nodes
datacenter = "ams2"

# this lets the server gracefully leave after a SIGTERM
leave_on_terminate = true

# again, double check that you insert your correct IP address!
advertise {
  http = "[public_ip_address]:4646"
  rpc = "[public_ip_address]:4647"
  serf = "[public_ip_address]:4648"
}

server {
  enabled = true

  # we are now setting up a 3-node cluster
  bootstrap_expect = 3
}

# these settings allow Nomad to automatically find its peers through Consul
consul {
  server_service_name = "nomad"
  server_auto_join = true
  client_service_name = "nomad-client"
  client_auto_join = true
  auto_advertise = true
}
The last consul block in the configuration is actually not required as these are the defaults, but I added them to show how Nomad integrates with Consul. By specifying the same settings on each node, Nomad will find the other servers and clients and will automatically bootstrap an entire cluster. Finally, start Nomad using systemd and if interested, use the journalctl command again to see the logs generated by Nomad.
systemctl start nomad
Perform exactly the same steps on your node in the other datacenter, of course making sure you insert the correct IP addresses and set the correct datacenter. For the third node we have to make a small change. As mentioned before and as visible in the architecture picture above, we will have a third node running Nomad but without running Consul. We need this Nomad server to also communicate with Consul however; finding its peers will otherwise be impossible. This is why earlier we configured Consul to listen on every IP address instead of only loopback addresses. Add the following bold line to your configuration for the third node:
consul {
  address = "[private_ip_address_other_node]:8500"
  server_service_name = "nomad"
  ...
Finally, start Nomad for your third node as well. Assuming that the three nodes were able to find each other through Consul and now that the bootstrap_expect = 3 constraint is fulfilled, Nomad will setup the cluster. This might take a few seconds; you can test if the cluster is ready through the following command:
nomad server-members
This should show you three different nodes, with one elected as leader, in two different datacenters and all in the same region. This means we have a multi-datacenter 3-node Nomad cluster up and running!
The final step is to setup two nodes with the Nomad client and Docker installed - this is where we will finally run our Docker containers.
Installing and configuring Nomad clients and Docker
Looking back at the architecture image, the “brain” of the setup is now configured and its time to install the clients for both Nomad and Consul. We will then finally be able to orchestrate a Docker image across datacenters. SSH into the last two nodes in the two datacenters and perform the following actions on both nodes.
You can install Nomad using the same method from the previous section. Also create the same systemd unit file for easier management. For installing Docker, pick your favorite method from the Docker installation guide. Be sure to start the Docker service after installation!
Create the following Nomad client configuration in /etc/nomad/client.hcl:
log_level = "DEBUG"
data_dir = "/tmp/nomad"

region = "eu"

# be sure to change the datacenter for your different nodes
datacenter = "ams2"

client {
  enabled = true
}

leave_on_terminate = true
consul {
  address = "[private_ip_address_other_node]:8500"
  server_service_name = "nomad"
  server_auto_join = true
  client_service_name = "nomad-client"
  client_auto_join = true
  auto_advertise = true
}
We could have installed a Consul agent on these servers as well, but re-using the already installed Consul servers from the other nodes in the same datacenter is much easier. Be sure to set the correct private IP address of the Consul server in the same datacenter, and start Nomad:
systemctl start nomad
That’s it - we should now have a multi-datacenter setup up and running! Check if your clients are installed correctly by issuing the following command on one of the nodes:
nomad node-status
This will show you the two clients running in two different datacenters. Finally, we will execute a job that will schedule four different Nginx containers. Save the following job specification under ~/nginx.nomad. It doesn’t matter which node - Nomad is installed on every one of them so you can register jobs everywhere.
job "nginx" {
  region = "eu"
  datacenters = ["ams2", "lon1"]

  group "webserver" {
    count = 4

    restart {
      attempts = 10
      interval = "5m"
      delay = "25s"

      mode = "delay"
    }

    task "nginx" {
      driver = "docker"

      config {
        image = "nginx:latest"
        port_map {
          web = 80
        }
      }

      service {
        name = "nginx"
        port = "web"
        check {
          name = "alive"
          type = "tcp"
          interval = "10s"
          timeout = "2s"
        }
      }

      resources {
        cpu = 500 # 500 Mhz
        memory = 64 # 64MB
        network {
          mbits = 10
          port "web" {
          }
        }
      }
    }
  }
}
I won’t go into detail about the job specification and syntax - be sure to check out the Nomad documentation for that. Important though is that for every job we can specify in which datacenters it should run - as we are setting up multi-datacenter container orchestration the whole point is of course to specify both datacenters (in my case, ams2 and lon1). In addition we set the amount of jobs to four; we should see these are spread amongst the two nodes. We will simply spawn the latest official Nginx image which will display the default Nginx page. Execute the job and check its status with the following commands:
nomad run ~/nginx.nomad
nomad status nginx

docker ps # run this on your Docker client nodes to see the actual docker containers running
Awesome! This means we have four different Nginx Docker containers running in two different datacenters which means we reached our goal: multi-datacenter container orchestration.
Conclusion
Hopefully this post shows how easy it is to setup a multi-datacenter Nomad cluster with Consul. The added Consul integration in Nomad 0.4 greatly simplifies the cluster creation. Be sure to play around with the job specification and try out new things. Add a node or two and destroy a node to see how failover works. A larger next step would to be use consul template to setup a load balancer such as HaProxy or Nginx in both datacenters that can direct traffic to spawn containers. Have fun!