Using Let's Encrypt for free automated SSL certificates
If you maintain your own server or servers with SSL certicates, you might know how annoying it can be to keep those certificates up to date. Especially when you have a multitude of servers, some possibly even serving the same certificates, this is a hassle to manage. Luckily, there is a solution, and its called Let’s Encrypt.
Introducing Let’s Encrypt #
Let’s Encrypt is a Certificate Authority (CA) that provides an automated method for requesting and renewing free Domain Validated (DV) SSL certificates. It is not possible to request the other certificate types (Organization Validation (OV) and Extended Validation (EV)) through Let’s Encrypt. These certificate types require some manual work from the CA and can thus not be automated. If you have good reason to go for an OV or EV certificate, Let’s Encrypt is not an option for you. Remember though: each certificate type is equally secure for your website visitors.
Let’s Encrypt started in November 2014, and came out of beta fairly recently in April 2016. Today, some of the biggest internet players such as Mozilla, Google, Facebook and Akamai are involved as sponsors and board members. Akamai, for example, allows you to use Let’s Encrypt certificates when using their CDN which can be setup from their control panel.
Closely related to Let’s Encrypt is the Automated Certificate Management Environment (ACME) protocol. This protocol describes how a server should communicate with the Let’s Encrypt servers to request and renew certificates. Everyone can create an utility that implements this protocol and communicates with the Let’s Encrypt servers. Keep in mind: Let’s Encrypt is the CA, and ACME is the protocol for requesting new certificates. Read more about the ACME protocol on the IETF’s Github page.
In general, requesting a certificate through the ACME protocol for example.com is done through the following steps;
- First the agent needs to authorize itself for requesting certificates for example.com. It does this through one of two options;
- Validation by creating an DNS record for example.com
- Validation by creating an HTTP resource under example.com/.well-known/acme-challenge
- In addition, the agent and Let’s Encrypt communicate a public/private key pair. This way, Let’s Encrypt can identify the agent in the future
- Let’s Encrypt will look for one of the provided resources. If it is found, the client is allowed to request certificates for this domain
- The client can now communicate traditional Certificate Signing Requests (CSRs) to the Let’s Encrypt servers. This request is signed with the earlier communicated public/private keypair so that Let’s Encrypt knows this client is authorized to request certificates for this domain.
- The certificates can now be found on your server under /etc/letsencrypt/live/example.com. All you have to do is point your webserver to these files.
The tool originally created by Let’s Encrypt that implements the ACME protocol is the certbot. Multiple other clients exist that allow you to request certificates in several different programming languages. In this blogpost, we’ll use the certbot.
Why is there a fixed location for the challenge file? #
When using the HTTP method for domain validation, Let’s Encrypt looks for a “challenge file” on your server. This file needs to be accessible through example.com/.well-known/acme-challenge/[filename]. This directory is set and can not be changed.
It turns out that this is a pretty important security detail. In June of this year, the CA StartSSL released a similar tool to Let’s Encrypt: StartEncrypt. This tool did allow you to change the location of the challenge file, and quite soon it became possible to receive valid SSL certificates for websites such as Dropbox and Google. Why? Because these websites allow you to upload files in a publicly accessible, raw format. In other words: you can request a Dropbox certificate by uploading the challenge file to your Dropbox folder. Check out the original blogpost that highlighted this issue for more details. In July, StartSSL started working on a new version of StartEncrypt that also implements the ACME protocol.
Configuration guide #
First of all, you need a webserver and a domain name pointing to that webserver with an A-record. In the rest of this blogpost, I will continue using example.com as a, well, example. The technology I will use is Nginx running on a CentOS 7.2 server. As we will be using the general webroot plugin, the received certificate can also be used for other webservers such as Apache.
The Nginx configuration that we will use in this blogpost to begin with is one that can be found on my Github account. This is an SSL Labs A+ rated configuration; details can be found in one of my earlier blog posts. I am going to assume some basic knowledge about Nginx and certificates. We will add a new Nginx location for the challenge file, and we are only going to slightly change the following three configuration lines;
ssl_certificate /etc/ssl/example.com.crt;
ssl_certificate_key /etc/ssl/example.com.key;
ssl_trusted_certificate /etc/ssl/example.com.trusted.pem;
Installing the certbot #
The certbot is packaged for a large number of Linux distributions. Check out the certbot installation guide for details on installation for your OS: if you are using CentOS or RedHat, you can simple do:
yum install epel-release
yum install certbot
certbot --version # 0.8.1 at the time of writing
Requesting the certificate #
We will need to configure Nginx for the challenge files. To do this, add the following to your Nginx configuration:
server {
  listen 80;
  server_name example.com www.example.com;

  location ~ /.well-known/acme-challenge {
    root /var/www/example.com;
  }
}
Reload Nginx to apply these changes. We will create a certificate for two domains so that we can redirect www-visitors to our actual non-www domain on HTTPS using the same certificate. The certbot will create the challenge file in /var/www/example.com/.well-known/acme-challenge.
The cerbot contains a dry-run feature that will fetch fake certificates from the Let’s Encrypt servers. This is the way to test the client before requesting the “real” certificates.. It’s important to use the dry-run feature as Let’s Encrypt has some rate limits that are easy to exceed when testing. Run the following command on your server;
certbot certonly --webroot --dry-run -w /var/www/example.com -d example.com -d www.example.com
The first domain that you specify will be the common name for the SSL certificate; the others will be added as Subject Alternative Names (SAN). After executing this command, you will get a blue screen requesting your e-mail address in case of urgent notices and lost key recovery. Next, you have to agree to the ToS after which you receive the certificates. By default, these are stored in /etc/letsencrypt/live/example.com. The files in here are symlinks; the actual certificates are stored in /etc/letsencrypt/archive/example.com. In this directory, renewed certificates will also be placed. The /live folder will simply point to the latest certificate that you have received. This way, you can always simply point your webserver to this file.
Congratulations! You have just requested your very first SSL certificates (though invalid) through the ACME protocol. If you run the same command again, you will get the option to renew your certificate: check out the /etc/letsencrypt/archive/example.com folder to now see two sets of certificate files. Also, to avoid getting the blue screens, you can use the following parameters in the future;
--email                Your e-mailaddress (only for first request)
--agree-tos            Agree with the ToS (only for first request)
--keep-until-expiring  Relevant when renewing your certificate; this will only renew it when its about to expire
--force-renewal        Force to renew the certificate, even when its not about to expire. Should only be used with --dry-run!
Are you ready for the real deal? Execute the previous command again but now without the –dry-run option. This will get you valid certificates. Edit your Nginx configuration file to point to the newly generated certificate files. You need these lines in your configuration:
ssl_certificate /etc/letsencrypt/live/example.com/fullchain.pem;
ssl_certificate_key /etc/letsencrypt/live/example.com/privkey.pem;
ssl_trusted_certificate /etc/letsencrypt/live/example.com/fullchain.pem;
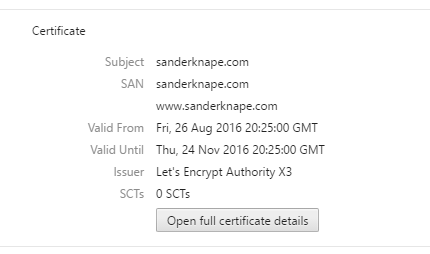
The last line is only required if you have OCSP stapling enabled on your server. Reload your Nginx configuration and check if your certificate works and is now coming from Let’s Encrypt. This is what it looks like for my website in Google Chrome:
You can also perform an an SSLLabs server test to check if everything works as expected.
Setting up automated certificate renewal #
Let’s Encrypt certificates are valid for 90 days. Compared with traditional CA certificate lifetimes of one or two years, this might seem really short. Considering we are going to automate the renewal of certificates, it shouldn’t really matter though, right? In fact, Let’s Encrypt is considering even shorter lifetimes. We just have to make sure we renew our certificates often enough.
The process of renewing certificates is easy. On a regular interval, most easily through the use of a cronjob, we check if our certificates need to be renewed and if yes, we do so. In fact, we can check if a renewal is necessary right now by running the following command:
certbot renew
This will probably tell you that the certificate we’ve setup just now is not due for renewal yet. Running this command will renew all certificates close to the expiry date on this server known that was initially created by the certbot. Appending the --force-renewal flag will renew the certificate regardless of its expiry date. Doing so will give you the following output;
-------------------------------------------------------------------------------
Processing /etc/letsencrypt/renewal/example.com.conf
-------------------------------------------------------------------------------

-------------------------------------------------------------------------------
new certificate deployed without reload, fullchain is
/etc/letsencrypt/live/example.com/fullchain.pem
-------------------------------------------------------------------------------

Congratulations, all renewals succeeded. The following certs have been renewed:
/etc/letsencrypt/live/example.com/fullchain.pem (success)
You can try this yourself but be sure to keep the rate limits in mind! When the new certificates are created, they are not immediately loaded by Nginx even though its configuration points to the overwritten files (symlinks). This is because Nginx has loaded the certificates in memory. Therefore we need to reload the configuration in order for Nginx to load the new certificates. We can easily do this through the --post-hook argument, where we can specify the argument to reload nginx. The full command then looks like this:
certbot renew --post-hook "systemctl reload nginx"
To fully automate the renewal, we only have to make sure this command is executed on a regular basis. Let’s setup a cronjob to do this.
Setting up a cronjob #
As we’ve seen, it’s perfectly safe to call the renew command even when the certificate is not due for renewal. It’s therefore no problem to execute this command weekly or even daily. We will create a cronjob that executes weekly.
Be sure you are logged in as the root user, and open up the crontab editing file with:
crontab -e
In the file that is now opened, append the following line:
@weekly certbot renew --quiet --post-hook "systemctl reload nginx"
@weekly is an alias for 0 0 * * 0 and, in my opinion, much easier to read than the alternative. It executes on the first minute of the first hour of the first day of every week. Of course, if you have a more specific moment in mind, edit the schedule accordingly. The --quiet flag hides any output except for errors. Whenever I read the cron logs, I’m not interested in a weekly “certificate not due for renewal” message in there.
Save the crontab file: you’re done! To test the cronjob, you can first set the cronjob to run every minute with the * * * * * schedule. Unfortunately, there isn’t a @minutely alias :-).
Conclusion #
We have successfully generated the initial SSL certificate and configured Nginx. We then setup automated renewal using cronjobs. If you expected more I have to disappoint you: this is it!