Table of Contents
Maintaining a web server for your website is not ideal. It’s tedious, takes a lot of time if done properly and distracts from what you really want to do: sell a product, share information, e.t.c. The more time and money you spend on the platform, the less is available to spend on the website and your core business. Unless you’re a hosting company of course, but then this blog post isn’t really for you.
Welcome to 2017. Today, everyone can build a global, high-traffic website even when you have little to none ops experience. AWS provides many different managed services that when put together correctly, form a powerful architecture that allows you to do so much without managing a single operating system or server. In other words: we’re going to build a serverless website.
A quick word on the term serverless before we move on. If you’re not familiar with the term and would like to know more, Martin Fowler has published a lengthy article on the subject. For the context of this blog post, I’d define serverless as a managed service that abstracts away the entire concept of the function of a server. This includes managing the hardware and operating system, as well as a webserver such as Nginx or Apache, autoscaling, and more. The service can either be a database, such as DynamoDB as we’ll see in this blog post, but also executing code such as AWS Lambda.
The goal of this blog post is to give an example of a serverless website, so don’t worry if the definition is rather vague: at the end you’ll have a better understanding of the concept. Let’s get started!
The website
The website that we’ll building will show a history of the S3 storage types prices. The prices will be stored in DynamoDB, and we’ll makes sure to keep the prices up to date by subscribing to the SNS topic provided by AWS. This topic will sent a notification when any prices for AWS have changed. The following diagram shows all components and their relations (click to enlarge). Combined, we have everything we need to build our serverless website.
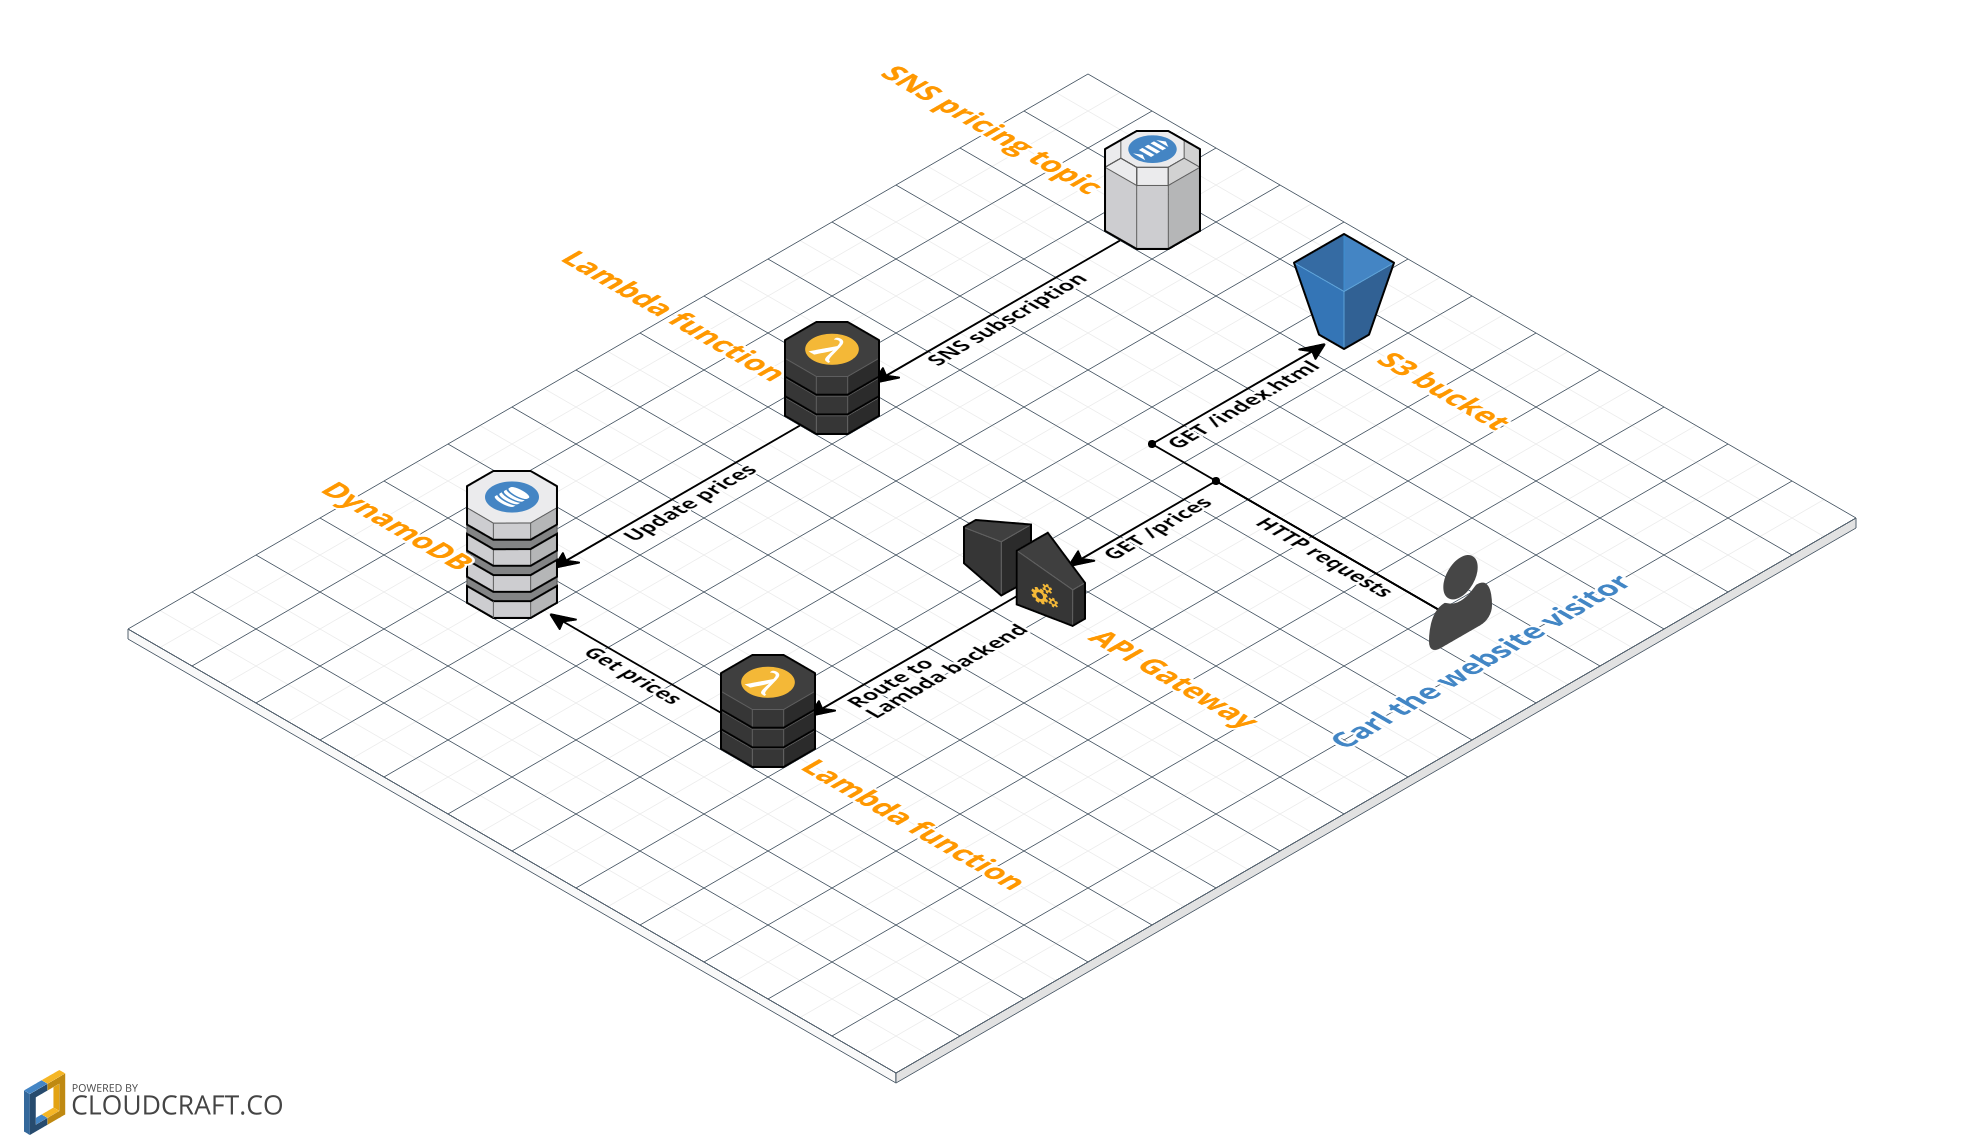
- SNS pricing topic. We will subscribe to an SNS Topic that notifies us when AWS prices have been changed.
- DynamoDB. This is where we’ll store the pricing history for S3 storage.
- Lambda functions. We’ll use two different Lambda functions: one to add new prices to DynamoDB, one to fetch all prices.
- API Gateway. We’ll expose the Lambda function that fetches prices through a REST API. As we’ll see, this is easy with API Gateway.
- S3. We’ll use an S3 bucket to host our static HTML containing Javascript to grab and show the S3 storage prices.
- Carl. Carl is our website visitor. Carl is very anxious to learn about the history of S3 storage prices.
I’ve setup a GitHub repository that contains the pieces of code required to run the website (the Lambda functions and the index.html). Let’s begin with setting up the core of our application: the DynamoDB table.
DynamoDB
We will use DynamoDB, a managed NoSQL database. Setting it up is very easy and, just like all the components for our website, there is almost nothing that we will need to manage. The only thing we would have to manage is the capacity, which we shouldn’t set to high so we pay too much, but also not to low so clients’ requests will get throttled. For now though, the defaults will do fine.
Open up the DynamoDB console and create a new table. Let’s call it s3_storage_prices. Set the primary key to id. Click Create to create the table.
We now have a DynamoDB table in which we can insert data. If you’re more experienced with an SQL database such as MySQL, you might expect that we need to create a schema. This is not required: as long as we add entries that have the id unique field, DynamoDB will accept whatever you put in it. With that said, it’s time to setup the Lambda functions that will put and get data to/from the table.
Setup Lambda functions
We glue together our components with two different Lambda functions. The first function will be invoked by the SNS topic when AWS notifies us of pricing changes. The function will then update the DynamoDB table to reflect the latest changes.
The second Lambda function will get the pricing information from DynamoDB and return it as a JSON array, to be processed by our frontend website that we built last.
Both functions are written for the NodeJS 6.10 runtime. They both need access to DynamoDB to get and insert the data from the table. Following the least privilege strategy (granting exactly the permissions a function needs: no more and no less), we would create two separate IAM roles: and that can only read and one that can only write. For now though, let’s take a shortcut and create a single role that can do both. The following steps guide you through the process;
- Open up the IAM Console. On the left, click Roles and click the “Create new Role” button at the top.
- Under the “AWS Service Role” tab, choose “AWS Lambda”. We’re going to create a role specifically for AWS Lambda.
- Type “DynamoDB” in the search field now visible. Select the “AmazonDynamoDBFullAccess” policy (NOTE: this gives you much more permissions than required, so create a custom policy with only the required permissions if you’re doing this in a production environment).
- Give the role a name such as “lambda-dynamodb-full-access” and click “Create role”.
Updating DynamoDB
The first function we’ll create is rather long as we have to process two separate JSON files, one of which contains tens of thousands of lines and has many different layers. Please find the function in my GitHub repository - otherwise this blog post would become annoyingly long.
Most of the code handles the processing of the prices file. To be honest - it’s rather boring and I’d rather not dive too much into that. AWS already properly explains the structure of the JSON files, so be sure to read that if you want to know more about it. Let’s first go through the lines of code that require some additional explanation:
- Line 6 and 7. We are hard coding the location of the region index file. This is the file that tells us where the find the pricing files per region. Before a recent update to the pricing API, there would be one file per service but AWS has split them up per region now.
- Line 13. Each of the four storage types has an internal Stock Keeping Unit(SKU), which is how AWS references them in the pricing files. We’ll hardcode them here so we don’t have to go through the additional logic of finding them in the files - they are constant anyway.
- Line 22. AWS is of course much more than just S3. If we receive a notification that a price other than S3 has changed, we won’t bother and stop the execution of the Lambda function.
- Line 26. This is where we open the first file to get URL to the latest S3 prices in eu-west-1.
- Line 35 and 37. The latest S3 prices in eu-west-1 URL is found here, and opened in line 37.
- Lines 47-56. This is where we loop through the 4 storage types and grab any relevant information. Per storage type, we perform a bulk update to insert the pricing information into DynamoDB.
- Lines 65-108. This function is mostly concerned with building the JSON representation of the prices that we insert. We build the
idproperty based on the concatenation of the date, storage type and ranges fields. This means that we’ll create a duplicate key when these values are already in the table. This way, we won’t add any duplicate data to the table (granted: there are cleaner ways to do this, but consider this an “insert if not exists” operation).
Let’s create a Lambda function using this code! First, open up the AWS Lambda console and create a new function. Choose the blank function in the next screen, and simply click “Next” in the trigger screen (we’ll do that later). Name the Lambda function update-s3-storage-prices. Copy the code from above into the function, and below choose the IAM role that we created earlier. Click “Next”, review your changes and click “Create function”. Time to create the second function.
Retrieving prices
Compared to the previous Lambda function, this function is much, much simpler. First, create a Lambda function exactly as the previous one but let’s call this one get-s3-storage-prices. Configure the function exactly as before, but with this code:
var aws = require('aws-sdk');
var dynamodb = new aws.DynamoDB();

exports.handler = (event, context, callback) => {
    dynamodb.scan({TableName: 's3_storage_prices'}, (err, data) => {
        callback(null, data['Items']);
    });
};
All we do here is use the DynamoDB scan operation to fetch all pricing information from the table. Though to be honest, not all: the scan operation returns no more than 1MB of data. If more data is in the table, you’d have to scan multiple times using a LastEvaluatedKey value to continue the scan. For now though, let’s keep it simple and just return whatever we receive.
We return all items received through the callback function, which is already in JSON. This is therefore all we need to read the prices from the table!
With both Lamda functions up and running, it’s time to invoke them using the SNS subscription and API Gateway, which is exactly what we’ll setup next.
The SNS subscription
With DynamoDB and the Lambda functions in place, it’s time to fill the table with data. The AWS Documentation regarding notifications about price changes is pretty straightforward. We’ll have this working with just a few steps:
- Open up the SNS Console and create a new Subscription
- As the Topic ARN, choose
arn:aws:sns:us-east-1:278350005181:price-list-api. This SNS Topic sends a notification after a price change. - Choose “Lambda” as the protocol. In the endpoint dropdown that appears, choose the
update-s3-storage-pricesfunction you just created.
And that’s it really. Every time AWS pushes a notification for price changes, the Lambda function will get invoked and update the DynamoDB table. Next, we’ll setup the endpoint that will invoke hte Lambda function that gets the pricing information from the DynamoDB table.
Setup API Gateway
API Gateway is a powerful product from Amazon that allows you to easily setup a RESTfull API. We are going to use it to provide access to the get-prices Lambda function we just created. Follow these steps to properly set up a new API.
- Open up the API Gateway console and create a new API. Make sure you select “New API” and not “Example API”. Give it a name, such as s3-storage-prices
- Select the ”Actions” dropdown and create a new GET method.
- For integration type, choose Lambda. Select the region where your Lambda function exists and type in the name of the get-prices Lambda function
- You will get a popup saying that you are about to give API Gateway permissions to invoke your Lambda function: click OK.
- We’ll need to enable CORS as our S3 bucket will be hosted on a different domain. Select the ”GET” method that you just created in the list and in the dropdown, select “Enable CORS”. This will setup a new OPTIONS method and by default enables cross-origin requests from any domain. For now you can leave the defaults but keep in mind that it is better to only allow access to your own website: in our example the S3 bucket URL.
- In the same “Actions” dropdown, select “Deploy”. Create a new deployment stage (such as “production”) and click “Deploy”. Open the URL that is presented to you and you should see the JSON output of the Lambda function!
Note that there are many more options in API Gateway that I won’t cover here such as throttling, authentication, caching and more. It’s a really cool product so be sure to check it out to learn more about it.
For now, that’s it though! We now have enabled everything that we needed to on the data layer. We have a DynamoDB table that is updated through notifications from SNS and an API Gateway endpoint that fetches the prices from the table. Let’s now create the website that displays these prices.
Create the S3 website bucket
The last two parts are relatively sample: write the HTML that display the prices, and upload this to an S3 bucket configured with static website hosting. Let’s begin with the HTML.
The HTML
The entire HTML can be found in the GitHub repository. I’ve used the basic template from the Bootstrap framework getting started guide and I’m using jQuery to load the S3 prices from API Gateway. The code should be pretty straightforward, but let me highlight a few parts:
- Line 14. This line shows a simple
_Loading prices..._text that is displayed while the prices are not yet loaded. - Line 30. This is the only line that you will have to change: replace this part with your API gateway URL.
- Line 35. This is the actual GET request to the API gateway. It returns the JSON in the
datavariable. - Line 41. We build the HTML from the
datavariable by looping through each price. - Line 50 and 60. We append all prices to the table and remove the initial
_Loading prices..._text.
Keep in mind that you expose your API gateway URL to everyone who views the HTML source or looks at the network requests in the browsers’ Inspector. For this situation, this is perfectly fine as, basically, we have nothing to hide. If however you are dealing with more sensitive data and don’t want your API to be publicly available, you will need to make the request to API gateway from a backend server. In that situation, using an S3 website is unfortunately no longer as an option as it only supports static HTML.
The final step is to upload this file to a properly configured S3 bucket.
The bucket setup
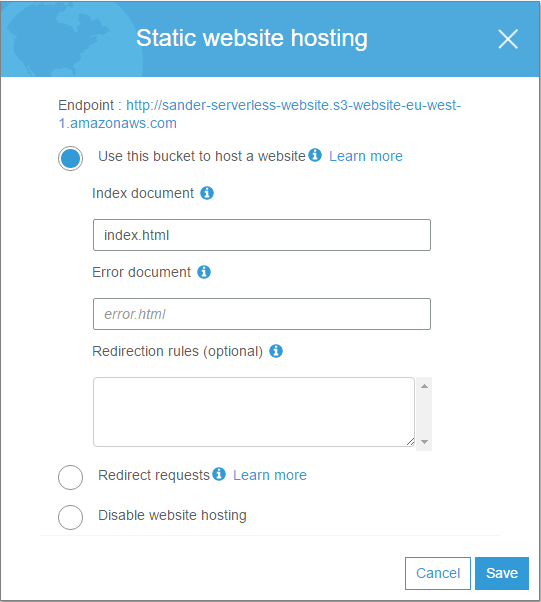
Create a bucket using any name you want. You can use all default settings. We’ll enable website configuration by going to the management -> website tab. Type in index.html for the Index document and leave the rest to the default values. Save the configuration.
Even though we enabled the website configuration for the bucket, any visitors won’t be able to access it yet because they are not allowed yet to open any pages. On the permissions tab, copy/paste the following bucket policy:
{
  "Version": "2012-10-17",
  "Statement": [
    {
      "Action": [
        "s3:GetObject"
      ],
      "Effect": "Allow",
      "Resource": "arn:aws:s3:::sander-serverless-website/*",
      "Principal": "*"
    }
  ]
}
This gives the entire world access to read all objects in the bucket. If you are not familiar with S3 bucket policies, check out the AWS documentation to learn more.
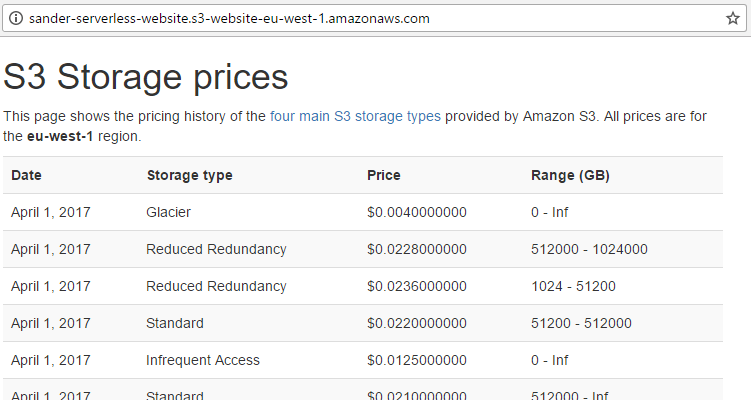
With that, the website should work. Type in the address of your S3 bucket (it’s at the top of the “static website hosting” screen) and you should see the index.html contents.
Conclusion
With that, our serverless website is all up and running! We’ve used SNS, AWS Lambda, DynamoDB, API Gateway and S3 together in such a way that we have a data-driven website without the need to manage any servers, operating systems or scaling. For the most part, we only pay for what we use: more with many visitors, less with few visitors. In addition, we can easily provide very fast performance to anyone in the entire world by enabling Amazon CloudFront in front of our S3 bucket. Definitely check out the AWS documentation if you’re interested in doing this.
Do keep in mind that this setup only works if you are OK with creating a public endpoint for your API that your website visitors can easily find. It’s less of a good idea to make an endpoint available that allows visitors to add or even delete data from your database. If you require an administration website for managing your database, you can separate this from the public website and use a web server for only the administration pages.
The goal if this blog post was to show an example of how to build a data-driven website without managing any (web)server. I hope this blog post will enable you to build really awesome websites with ease. Let me know if you did!