Running self-hosted GitHub Actions runners in your Kubernetes cluster

Last year November GitHub released GitHub Actions, a CI/CD solution build on top of GitHub’s Source Code Management. GitHub Actions is very convenient to use when your source code is already stored in GitHub as no additional tool is required for your CI/CD requirements. This blog is for example updated through a GitHub Actions workflow whenever I push an update to my GitHub repository (like I just did with this post).
Earlier this year GitHub released support for self-hosted runners. These runners run in your own infrastructure which has several advantages. Especially useful is the fact that these runners can access any private resources in your infrastructure such as staging environments for automated testing or secret/artifact management solutions not exposed publicly.
The main downside to keep in mind with these runners however is that they are attached to a repository, and can not be enabled for an entire organization. This is something that should become possible later this year.
In this blog post I’ll go through the process of configuring self-hosted runners in Kubernetes. We’ll wrap the runner binary in a Docker image and deploy this image using a Kubernetes Deployment. Let’s get started!
Process #
In general the process is faily simple. And simple is good.
We build a Docker image that has the GitHub runner binary installed. Through the GitHub API, a registration token can be requested. We do this on the startup of the container using a GitHub Personal Access Token. There is also an API endpoint to remove a runner. We call this API as the container shuts down.
We wrap this container in a Kubernetes Deployment so that we can easily set a desired number of replicas to reflect the number of runners that we want to have runner. In addition, the Kubernetes Deployment also spins up a new container in the event where a container has crashed.
Docker image #
The source code for the Docker image looks as follows:
FROM debian:buster-slim

ARG GITHUB_RUNNER_VERSION="2.165.2"

ENV RUNNER_NAME "runner"
ENV GITHUB_PAT ""
ENV GITHUB_OWNER ""
ENV GITHUB_REPOSITORY ""
ENV RUNNER_WORKDIR "_work"

RUN apt-get update \
    && apt-get install -y \
        curl \
        sudo \
        git \
        jq \
    && apt-get clean \
    && rm -rf /var/lib/apt/lists/* \
    && useradd -m github \
    && usermod -aG sudo github \
    && echo "%sudo ALL=(ALL) NOPASSWD:ALL" >> /etc/sudoers

USER github
WORKDIR /home/github

RUN curl -Ls https://github.com/actions/runner/releases/download/v${GITHUB_RUNNER_VERSION}/actions-runner-linux-x64-${GITHUB_RUNNER_VERSION}.tar.gz | tar xz \
    && sudo ./bin/installdependencies.sh

COPY --chown=github:github entrypoint.sh ./entrypoint.sh
RUN sudo chmod u+x ./entrypoint.sh

ENTRYPOINT ["/home/github/entrypoint.sh"]
The entry point then is configured as follows:
#!/bin/sh
registration_url="https://api.github.com/repos/${GITHUB_OWNER}/${GITHUB_REPOSITORY}/actions/runners/registration-token"
echo "Requesting registration URL at '${registration_url}'"

payload=$(curl -sX POST -H "Authorization: token ${GITHUB_PAT}" ${registration_url})
export RUNNER_TOKEN=$(echo $payload | jq .token --raw-output)

./config.sh \
    --name $(hostname) \
    --token ${RUNNER_TOKEN} \
    --url https://github.com/${GITHUB_OWNER}/${GITHUB_REPOSITORY} \
    --work ${RUNNER_WORKDIR} \
    --unattended \
    --replace

remove() {
    ./config.sh remove --unattended --token "${RUNNER_TOKEN}"
}

trap 'remove; exit 130' INT
trap 'remove; exit 143' TERM

./run.sh "$*" &

wait $!
You can also view the source code in my GitHub repository.
The Dockerfile does little more than download and install the GitHub self-hosted runner with the currently latest version at the time of writing. A github user is added to the image with sudo permissions. Some additional packages are installed such as jq to be able to parse the JSON that we receive when we request a registration token at GitHub.
The GITHUB_OWNER and GITHUB_REPOSITORY environment variables are used to construct the URL to the registration token for this specific repository. The Personal Access Token (PAT) in the GITHUB_PAT environment variable is then used to request a registration token. Your PAT requires repo scope for private repos and public_repo scope for public repos (see documentation).
When the container is shutdown, a termination event is send to the container. We listen to this event and properly deregister the runner using the registration token that was retrieved earlier.
Kubernetes deployment #
The following Kubernetes Deployment will spin up a single GitHub runner. You can change the value of the replicas property to spin up more or less runners. As you change this value with an existing deployment, you will notice in the “Actions” settings of your GitHub repository that the runners are properly added and removed from the repository. Do note that you must store your PAT in a Kubernetes Secret first and properly reference it from the Deployment.
apiVersion: apps/v1
kind: Deployment
metadata:
  name: github-runner
  labels:
    app: github-runner
spec:
  replicas: 1
  selector:
    matchLabels:
      app: github-runner
  template:
    metadata:
      labels:
        app: github-runner
    spec:
      containers:
      - name: github-runner
        image: sanderknape/github-runner:latest
        env:
        - name: GITHUB_OWNER
          value: your-organization
        - name: GITHUB_REPOSITORY
          value: your-repository
        - name: GITHUB_PAT # stored separately in a Kubernetes Secret
          valueFrom:
            secretKeyRef:
              name: my-secret
              key: pat
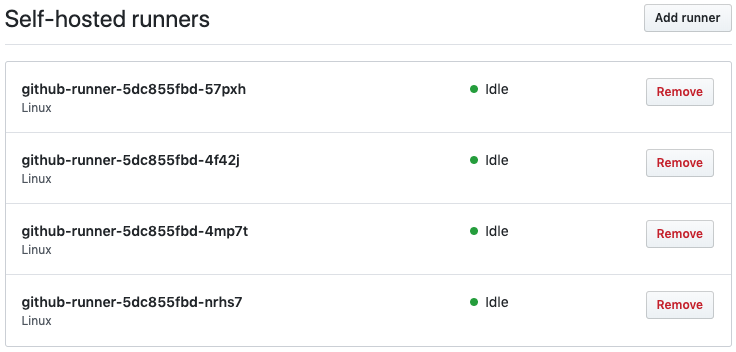
You can for example set the number of replicas to 4 and see the following in your GitHub repository:
Autoscaling #
GitHub self-hosted runners work differently compared to private GitLab runners. With GitLab, you deploy a single container that polls the GitLab server for any jobs that it must execute. Once a job is in the queue, this container will spin up a new, clean container in which that job is run. Once the job is finished, this new container is then removed. If more than one job is in the queue, multiple containers can be spawn to run these jobs - you can also configure how many of these containers must be spawned.
The GitLab method is superior to the GitHub approach in two major ways. First, because a clean container is spawn for every job, you do not have the risk of a job changing the “global state” (e.g. removing a package) on which another job is dependent. Second, with the GitLab approach you only run job containers as they are needed. This is more cost effective as with the GitHub approach you may be running containers waiting for jobs that are not being utilized.
I therefore did a little investigation in an autoscaling method for the GitHub runner. Through the GitHub worklow jobs API some information can be queried that can help in enabling this. While I haven’t tested this, it seems that you can get a list of jobs - including pending jobs. Thus, if you query the amount of “pending” jobs that are waiting to be executed, you could scale the amount of GitHub runners based on this number.
There is one caveat with this though: when 0 (zero) GitHub runners are registered at a repository, any jobs that must be executed on the self-hosted runners will fail. They do not get queued but they simply fail because there are no runners available that adhere to the requirements. This is easily fixed by always running at least one runner within the Kubernetes Deployment, but it does mean that you can not scale down to zero runners to optimize costs.
If anyone has already attempted to enable auto-scaling for GitHub runners I would definitely be interested in hearing if it works!
Conclusion #
GitHub Actions is a powerful new addition to GitHub and a convenient way for running your CI/CD workflows. With the popularity of Kubernetes as a compute platform, I’m sure more people want to deploy these runners to their Kubernetes clusters. With the fairly recent release of the self-hosted runners not a lot of information can be found yet on people’s experiences with this feature. I hope this blog post helps you in configuring the runners in your infrastructure; let me know about your experiences!