Table of Contents
Performing (automated) tests on pull requests is a powerful mechanism to reduce the feedback loop on code changes. Known as shift left, the idea is that the earlier you find an issue with your code, the easier it is to fix it. For one, as you wrote the code recently it’s easier to get back into it. And of course, any code issue that doesn’t hit production is another potential issue for your end-users prevented.
There are situations in which it makes sense to spin up the pull request in a (temporary) environment. This allows someone to manually login to the environment and see if everything looks OK. It may also be a convenient way to run automated end-to-end or integration tests as other dependencies (e.g. databases or other services) can also be available in that environment.
When it comes to deploying pull requests, there are a few things you can do:
- Automatically deploy all your pull requests to a temporary environment
- Deploy no pull requests
- Something in the middle
Something can be said for all options. In many cases it doesn’t make sense at all to deploy a pull request (e.g. for libraries). While deploying all your pull requests may sound convenient at first, there are actually some things you’d have to think about:
- What about any dependencies such as databases or other services? Maybe any (automated) integration tests you run also change the state in those dependencies. This might mess up other temporary environments deployed through other pull requests. You may therefore also temporarily spin up copies of those dependencies as part of your pull request. While this is certainly possible, the complexity does increase and it may not be fruitful to spend the effort required to build and maintain this.
- Deploying all your pull requests might start to get expensive when they need many resources and/or when many pull requests are typically open at the same time. This is especially a waste of money, time and energy when you don’t run (useful) automated tests on these environments and no one really ever manually checks them out neither.
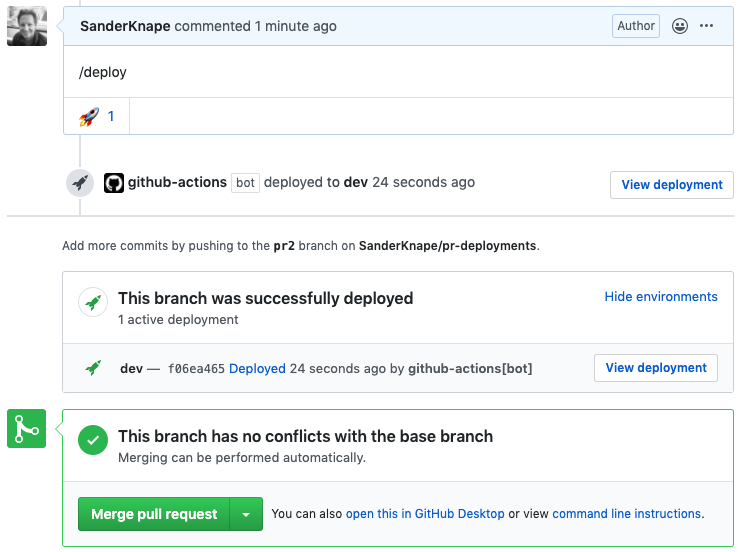
So what if you could decide which pull request to deploy to an environment? In this blog post I’ll share a workflow for manually deploying only specific pull requests through the use of GitHub comments. With some changes, the workflow is definitely also usable for deploying every pull request to a temporary environment (you’ll just need a few changes to the workflow). I’ll use the GitHub Deployments construct to keep track of the status of these deployments. It actually looks really good in the UI:
Let’s get started!
Workflow
The full workflow is in my GitHub repository and a tad too large to fully paste here. Instead, I’ll go over all the steps and explain anything noteworthy.
Check for the correct comment
The workflow is triggered by commenting on a pull request. The following GitHub Action event is used to achieve this:
on:
  issue_comment:
    types: [created]
You could of course also trigger the workflow for every pull request if that suits your use case better. This should be possible through only making some minor changes to my workflow.
We don’t want to trigger a deployment for all comments made on a pull request. Instead, we’ll use the convenient Khan/pull-request-comment-trigger GitHub Action. This Action allows us to check for a specific comment (or prefix) and lets us continue the workflow only if that specific comment is made. In addition, it can add a emoji to the comment to let the commenter know the workflow has been triggered - a deployment notification is already added below the comment, so the emoji is a bit redundant but I like it anyway.
In my case I only want to trigger a deployment when a comment with the contents /deploy is made. You could of course make it possible to select which environment to deploy to. You may for example trigger different workflows on comments such as /deploy:test, /deploy:dev1 or /deploy:dev2.
You can check if a deployment should be triggered through the triggered output from this action. However, we would need to do this for every step that follows this step. Instead, I decided to use job outputs and split it up the workflow into two jobs. The deployment logic is in the second job which is thus only triggered if the correct comment was made.
Start the deployment
If the correct comment was made, the next step is to create a GitHub Deployment object and to start the actual deployment. Unfortunately, the issue_comment event data does not contain the branch name. We need this reference so that the deployment is correctly associated with this pull request.
We’ll therefore perform a GitHub API call first to fetch the branch name that is associated with this pull request. The octokit/request-action GitHub Action is a small wrapper around the GitHub API and a convenient way to use the API. Using the branch name we can then create the GitHub Deployment object. These steps look like this:
- name: get pull request ref
  id: get_pull_request_ref
  uses: octokit/[email protected]
  with:
    route: GET /repos/:repository/pulls/:issue_id
    repository: ${{ github.repository }}
    issue_id: ${{ github.event.issue.number }}
  env:
    GITHUB_TOKEN: "${{ secrets.GITHUB_TOKEN }}"

- name: create deployment
  id: create_deployment
  uses: octokit/[email protected]
  with:
    route: POST /repos/:repository/deployments
    repository: ${{ github.repository }}
    ref: ${{ fromJson(steps.get_pull_request_ref.outputs.data).head.ref }}
    environment: dev
    auto_merge: false
  env:
    GITHUB_TOKEN: "${{ secrets.GITHUB_TOKEN }}"
Slightly annoying and confusing is that behind the scenes, GitHub considers both pull requests and issues to be an “issue” object. Therefore we set the issue_id property in the first API request to get the branch associated with the pull request.
We then use the fromJson function to parse the response from the first API call, and forward the branch name to the create deployment API call.
The initial state for a Deployment is pending. We therefore perform another API call to set the status to in_progress. In addition, the environment_url and log_url properties are passed to respectively include the URL to the actual environment and the URL to the build log.
Finally, the deploy the pull request step in the workflow performs the actual deployment logic for this pull request. In my example, I sleep for 10 seconds and randomly (50⁄50) let the deployment either succeed or fail. You can do everything you want here of course. You may even trigger another CI/CD tool which triggers the actual deployment and only use the GitHub Deployment object to give useful information about the deployment status within the GitHub UI.
Finish the deployment
In my example I include the situations where a deployment may succeed or fail. If the deploy the pull request step ran successfully, the set deployment status to success step will trigger and update the status to success. One thing to note is that properties such as environment, environment_url and log_url must be passed again to the GitHub API. If you don’t, these properties are considered empty and their links are removed from the GitHub UI.
Finally, using context expressions you can run a step when a previous step has failed. We use this to notify the user that a deployment has failed.
Final notes
The main benefit of this workflow is in my opinion the fact that the deployment status is visible within the pull request. As mentioned before: your entire deployment logic may even exist in a completely different CI/CD tool. You could also use this GitHub Action workflow just to provide this feedback in the same UI as where your source code lives.
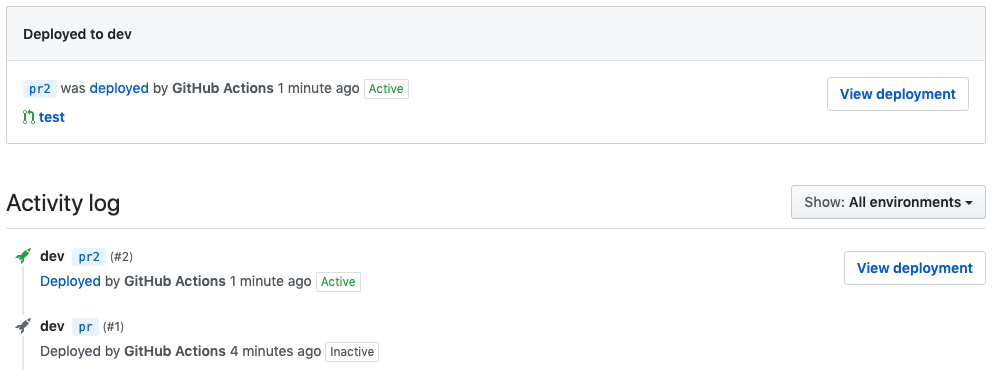
When a second pull request is deployed and therefore supersedes the deployment of an initial pull request, you can also easily see this in the UI. The first pull request is considered “inactive” and will no longer include the links to the environment and the build log, like this:

Finally, the slightly hidden deployments page for your repository (hidden under an “environments” button, right from the commits/branches/etc. buttons) also displays the latest deployment to an environment:
Of course there are many possibilities to further extend this workflow such as Slack notifications, an approval mechanism or dynamically spinning up temporary environments. Don’t hesitate to share your ideas and thoughts below in the comments!