Integrating ReactJS with the Google Maps widget
ReactJS is a Javascript library for building user interfaces. The way it ties in with HTML makes it very easy to create interactive components that can easily be reused among different locations within your application. Typically, people build Single Page Applications (SPA) using React. This way, much of the logic required to display a webpage is brought to the visitors’ browser. Instead of HTML, the web server often returns JSON and React grabs this to build the HTML within the browser.
Learning a new powerful library such as React always take some time. One of the topics people seem to be having a hard time to get their heads around is how to use React together with an external widget. This “external” widget is managed outside of React’s state and changes in that widget are not reflected in a React component. In general, when working with widgets you have two options;
- Completely rebuild the widget in React. A widget executes API calls to a backend server. If you can perform these API calls yourself you can also build the logic of the widget yourself in React. This is definitely the method that keeps you closest to React but will also bring you (much) more work. Of course, if someone else already rebuild the widget in React and shared it online (such as through npmjs), you can use that version.
- Wrap a React component around the widget. If you can subscribe to events published by the widget you can duplicate the state in React and work this component as you normally would.
In this blog post, we pick option 2 and build a React component around the Google Maps widget. Any state changes in the widget are published as events, allowing us to subscribe to those events and store the state in our component.
I am going to assume you already know at least the basics of how to work with ReactJS and have some experience with the create-react-app. The widget will be built around this Google Maps Autocomplete example from the Google documentation. As always, the full code that we’ll incrementally build in this blog post can be found in my GitHub repository.
Let’s get started!
Setting things up #
By far the easiest method to get started with React is the create-react-app. Set up your new application with the following command:
create-react-app google-maps
This will take a few minutes, so grab a beer or a coffee while you’re waiting. Once it’s done, cd into the new directory and run npm start to start the application.
In the source folder, delete every file except for App.js, index.css and index.js. Fill the index.css with the CSS from the above autocomplete example. Replace the first element in the CSS with the following (don’t worry; we won’t be touching the CSS again):
#root, #app, #map {
  height: 100%;
}

#state {
  width: 200px;
  float: left;
}

#map {
  margin-left: 200px;
}
We can leave the index.js as is; all it does is render our application in the HTML. For starters, create the App.js file as follows:
import React from 'react';

import './index.css';

export default class App extends React.Component {
  componentDidMount() {
    let map = new window.google.maps.Map(document.getElementById('map'), {
      center: {lat: -33.8688, lng: 151.2195},
      zoom: 13,
      mapTypeId: 'roadmap',
    });
  }

  render() {
    return (
      <div id='app'>
        <div id='map' />
      </div>
    );
  }
};
We don’t do nothing more yet than include the CSS we copied from the Google documentation and the mandatory text to start with. In addition, we load the Google map inside the #map element in our HTML. We do this in the componentDidMount() lifecycle function so that we know for sure the page has already been rendered. Next, change the public/index.html file so it looks as follows:
<!doctype html>
<html lang='en'>
  <head>
    <meta charset='utf-8'>
    <meta name='viewport' content='width=device-width, initial-scale=1, shrink-to-fit=no'>
    <title>Google Maps</title>
    <script src='https://maps.googleapis.com/maps/api/js?key=YOUR_API_KEY&libraries=places'></script>
  </head>
  <body>
    <div id='root'></div>
  </body>
</html>
Replace YOUR_API_KEY with your API key. Check out the Google documentation to learn how to get an API key. The way we include the Google Maps Javascript file will block further rendering until it is loaded. This way, we can be sure that the Javascript is loaded once the componentDidMount() function executes.
Finally, start the application using npm start (make sure you are in the root directory of your project). You should now see a Google Maps interface filling your entire screen except for some white space on the left (we’ll get to this in a second):

Great. So let’s recap what we’ve been up to;
- We load the Google Maps API in the ‘old-fashioned’ way: through a script element in the HTML. We also load the places API so that we can search for places.
- We have a basic, minimal React application up and running with a single component.
- In the React application, all we do is use the Google Maps API to load the default map into an HTML element.
Next, let’s figure out how to grab state changes from the API and store these into our React component.
Catching Google Maps events #
Let’s see how easy it is to store the state of the Google maps widget into our component. First, add the following constructor to the component (remember, if you prefer you can already check the final code in my GitHub repository):
constructor() {
  super();
  this.state = {
    zoom: 13,
    maptype: 'roadmap',
  }
}
As you can see, we are going to store two properties of the widget in our state. We initialize these properties with the same values as we load the map right below. Next, at the end of the componentDidMount() function, add the following:
map.addListener('zoom_changed', () => {
  this.setState({
    zoom: map.getZoom(),
  });
});

map.addListener('maptypeid_changed', () => {
  this.setState({
    maptype: map.getMapTypeId(),
  });
});
This is where the magic happens and as you can see, it’s just plain ol’ Javascript. We listen to events triggered by the widget and store the state in our component. Be sure to check out the events documentation to learn what other events you can subscribe on.
Finally, let’s show the React component state in the empty part of our screen by prepending the following HTML right before the #map element:
<div id='state'>
  <h1>State</h1>
  <p>
    Zoom level: {this.state.zoom}<br />
    Map type: {this.state.maptype}
  </p>
</div>
Save the changes to the file and open up your browser tab again. Change the map type (for example to “Satellite”) and zoom in and out a bit. You will see the state on the left keeps up to date with whatever you do. Looks like we properly wrapped the React component around the Google Maps widget!
Adding autocomplete #
Let’s go a bit more advanced and add search functionality with autocomplete to our map. We add an HTML input element and load the Autocomplete API using this input. When we start typing we will see location suggestions generated through the Google Maps API. This is where we see the most benefit us using the Google Maps widget and wrapping the React component around it. It’s very easy to add the autocomplete functionality whereas with the other option - completely rebuilding it in React - would be more work.
We are going to store some extra state. In the constructor, change the this.state object so it looks as follows:
this.state = {
  zoom: 13,
  maptype: 'roadmap',
  place_formatted: '',
  place_id: '',
  place_location: '',
};
Next, within the componentDidMount() function, add the following at the end:
let marker = new window.google.maps.Marker({
  map: map,
  position: {lat: -33.8688, lng: 151.2195},
});

// initialize the autocomplete functionality using the #pac-input input box
let inputNode = document.getElementById('pac-input');
map.controls[window.google.maps.ControlPosition.TOP_LEFT].push(inputNode);
let autoComplete = new window.google.maps.places.Autocomplete(inputNode);

autoComplete.addListener('place_changed', () => {
  let place = autoComplete.getPlace();
  let location = place.geometry.location;

  this.setState({
    place_formatted: place.formatted_address,
    place_id: place.place_id,
    place_location: location.toString(),
  });

  // bring the selected place in view on the map
  map.fitBounds(place.geometry.viewport);
  map.setCenter(location);

  marker.setPlace({
    placeId: place.place_id,
    location: location,
  });
});
This code requires some explanation. First, we add a marker to the map so that we can pinpoint the selected location. Next, we initialize the autocomplete functionality by using the google.maps.places.Autocomplete API. We feed this the #pac-input element so that the API knows to provide autocomplete to whatever is typed in this element.
Next, we add a listener so that we are notified of selected locations. We first store the location in the React state and then update the map and marker so that the selected location becomes pinpointed and in view within the map.
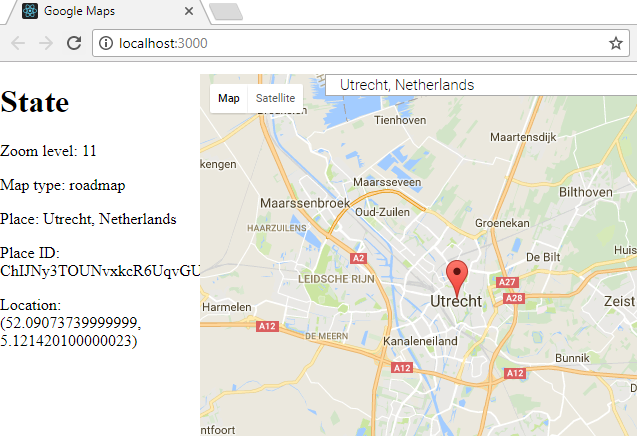
Finally, we add some extra elements to the HTML to see our state updates and to add the referenced #pac-input element. First, add the following to within the HTML #state element:
<p>Place: {this.state.place_formatted}</p>
<p>Place ID: {this.state.place_id}</p>
<p>Location: {this.state.place_location}</p>
Then, in-between the #state and the #map element, add the following:
<div id='pac-container'>
  <input id='pac-input' type='text' placeholder='Enter a location' />
</div>
That’s it! Save your changes and you will now see the added input element to your map. Start typing a location, select it and the map will update to the location you selected. Also, on the left you see that we track the state within React as well.
Conclusion #
In this blog post I’ve shown how easy it is to wrap a component around the Google Maps widget. We use the widget’s events to keep the React component up to date with state changes. The alternative - completely rebuilding the widget within React - is much more work. I’d like to think my pragmatic side sometimes wins from my desire-to-perfection side. Happy coding!