Table of Contents
I’ve written about serverless architectures before (a serverless website in S3 and dynamic image generation with Lambda). I strongly believe in this notion as it minimizes required maintenance and makes the initial setup much easier. Of course, there is no silver bullet for every problem but use cases definitely exist where a serverless architecture makes a lot of sense.
One such use case for serverless is a small piece of functionality that you just need to run. Somewhere. You want to care as little as possible about this somewhere because the functionality is so small that pretty much any work you put into the somewhere is more than the time you spend on the actual functionality.
One such functionality is the generation of a pre-signed S3 URL. These URLs are used to get temporary access to an otherwise private S3 bucket and can be used for downloading content from the bucket or for putting something in that bucket. The pre-signed URL is generated with an expiration data, after which it can not used anymore by anyone else in case the URL somehow gets compromised.
In this blog post we’re going to upload a file into a private S3 bucket using such a pre-signed URL. Before we upload the file, we need to get this temporary URL from somewhere. Where exactly is described in the following architecture (click to enlarge);
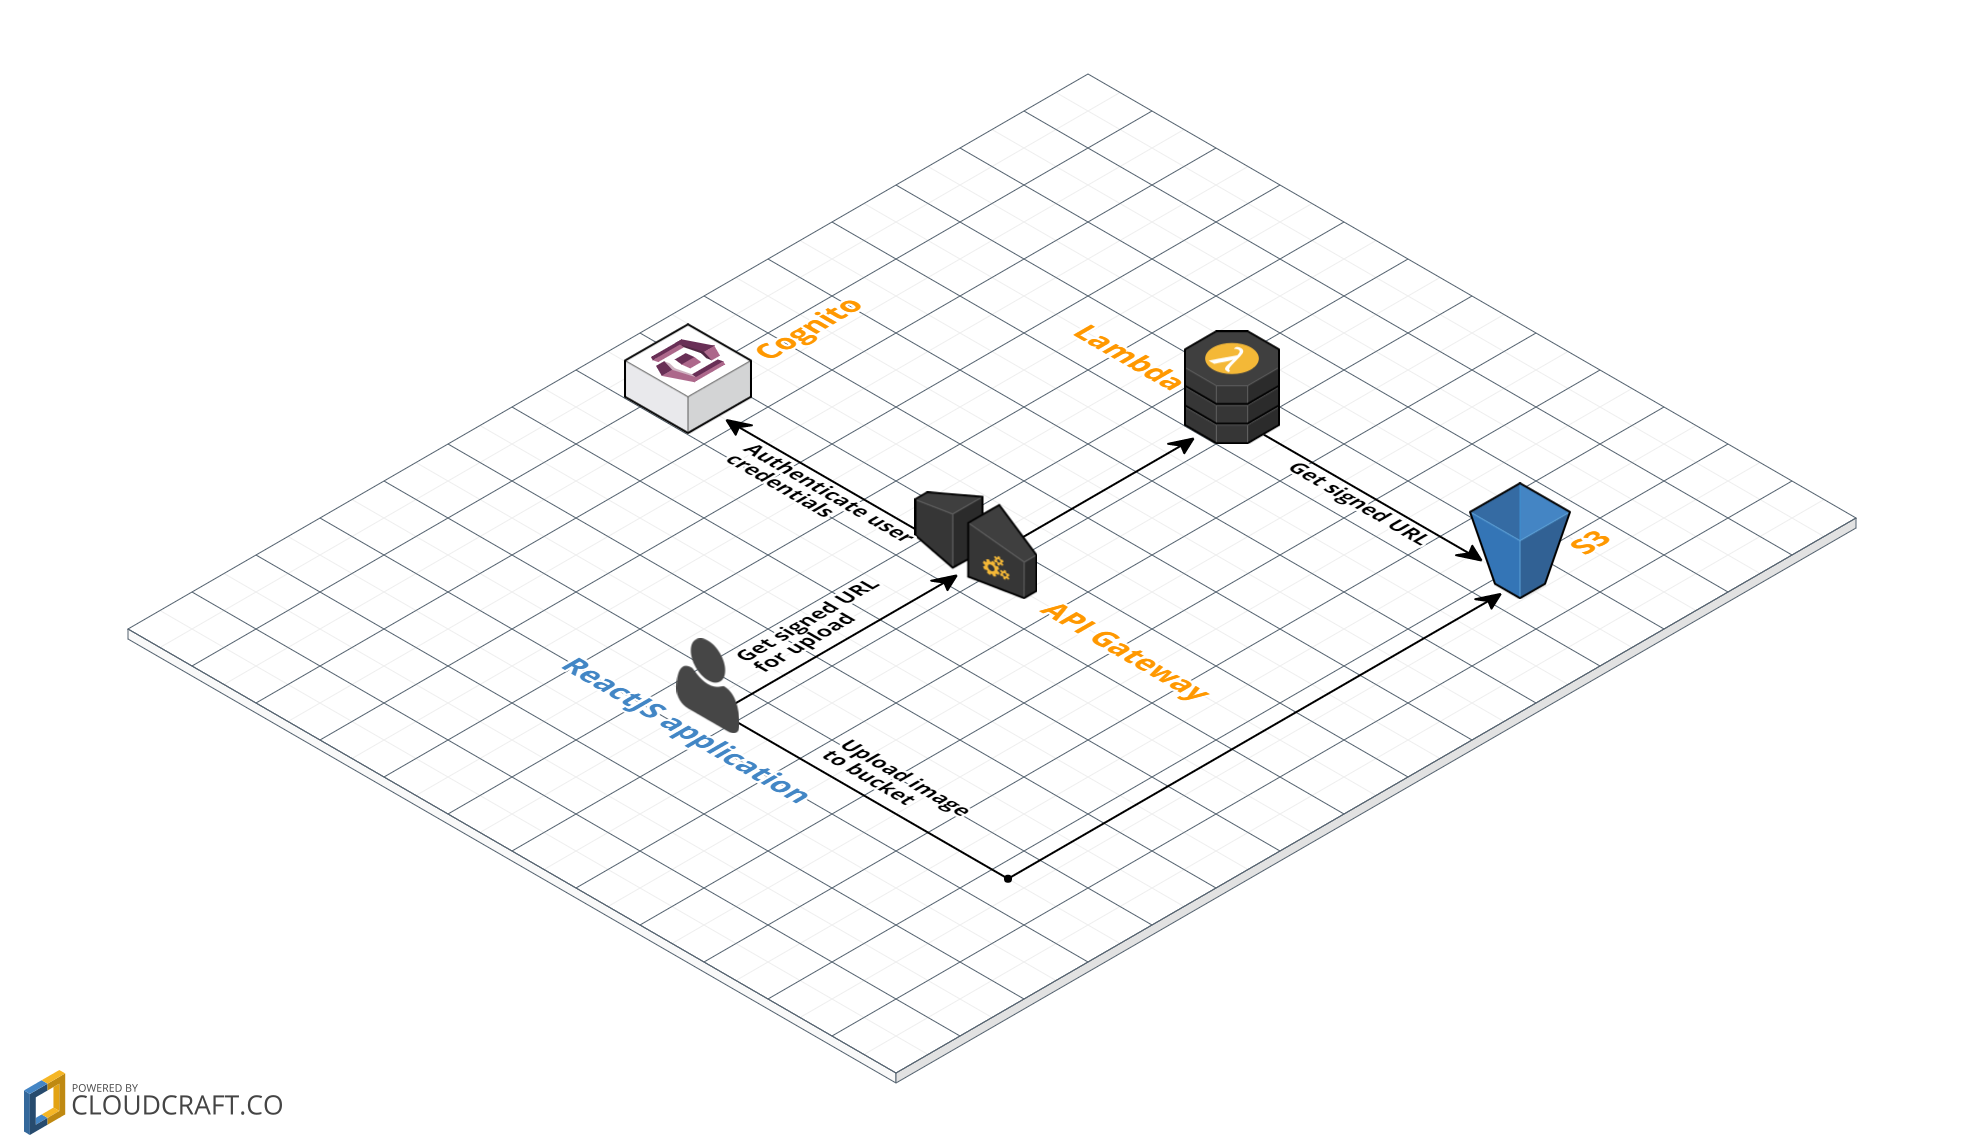
We are going to build a ReactJS application that allows you to upload files to an S3 bucket. First, it gets the pre-signed URL through AWS API Gateway from a Lambda function. We only want known users to get such an URL, so we require the user to sign in first and authenticate when requesting the URL. Next, the URL is used to put a file into an otherwise completely private bucket.
Setting up the components
Let’s build our application step by step. We’ll first set up all AWS components and then get everything together in the ReactJS application.
S3
Let’s begin with the easiest step: creating an S3 bucket. Make sure that in the ACL you, as the owner, are allowed to put objects into the bucket. The name of the bucket also is not important; just make sure you keep it close for the next step. Finally, we need to allow PUT requests in the CORS configuration. Edit it so it looks like this:
<CORSConfiguration>
  <CORSRule>
    <AllowedOrigin>*</AllowedOrigin>
    <AllowedMethod>GET</AllowedMethod>
    <AllowedMethod>PUT</AllowedMethod>
    <MaxAgeSeconds>3000</MaxAgeSeconds>
    <AllowedHeader>Authorization</AllowedHeader>
  </CORSRule>
</CORSConfiguration>
Lambda
Next up is the Lambda function that will generate the pre-signed URL for uploading the object. Create a NodeJS 6.X Lambda function. For the IAM role, make sure you use a role that can put objects into a bucket. You don’t need any specific permissions to generate a pre-signed URL. The URL contains a temporary token that allows the user to upload a key on your behalf; PutObject is therefore enough.
var AWS = require('aws-sdk');
var s3 = new AWS.S3({
  signatureVersion: 'v4',
});


exports.handler = (event, context, callback) => {
  const url = s3.getSignedUrl('putObject', {
    Bucket: '**\[YOUR-S3-BUCKET\]**',
    Key: 'mykey',
    Expires: 10,
  });


  callback(null, url);
};
Be sure to replace the YOUR-S3-BUCKET with the name of your S3 bucket. Notice the signatureVersion added to the creation of the S3 object; this allows us to properly sign chunked uploads. No worries though: the SDK will completely handle chunked uploads for us behind the scenes.
We specify a static key for the to-be uploaded object and we’ll have the temporary token expire in 10 seconds. As long as your file isn’t touching the hundreds of megabytes, this should be more than enough and minimizes the window where someone could potentially abuse the URL.
AWS Cognito
Next up is our authentication provider. AWS Cognito is easy to set up and integrates perfectly with API Gateway. Set up AWS Cognito through the following steps;
- Visit your AWS console and go to the AWS Cognito service. Click on “Manage your User Pools” and click “Create a User Pool”.
- Specify a name for your pool and click “Review Defaults”.
- Optional: edit the password policy to remove some of the requirements. If you are just testing, using simple passwords will make it easier.
- Click the “Add app client” link. Specify a name for your app and be sure to _disable_ the client secret.
- Click “Create app client”, then “Return to pool details” and finally “Create pool”. Take note of the _Pool Id_ at the top of the page and click on the apps page. Here, take note of the App client id.
Next, add a user to your pool. For the purposes of this demo we’ll keep it simple: only add a username and a password to your user. The popup should look something like this:
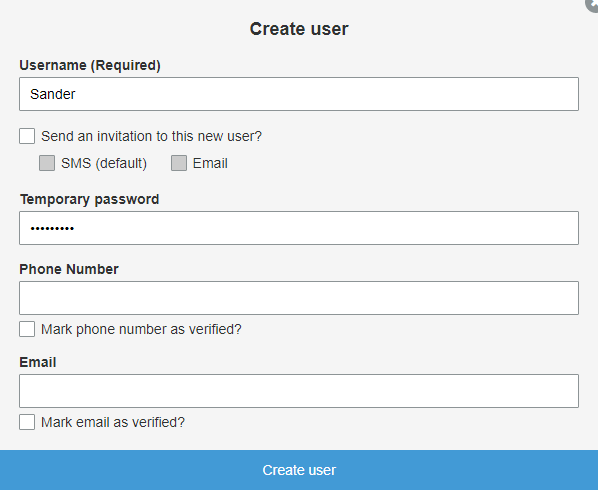
Be sure all check boxes are disabled. After creating the user you might notice that it’s currently not enabled and that we first need to change the password before we can properly login. We’ll get back to that in a bit. Just be sure to remember your (temporary) password as we’ll use it to login later.
API Gateway
Next up is API Gateway. We’ll hook it up to AWS Cognito for authorization and then forward the request to AWS Lambda. Lambda will then return us the pre-signed URL, which we return to the client through API Gateway. Perform the following steps to properly configure a new API endpoint:
- Open up the API Gateway console and create a new API. Make sure you select “New API” and not “Example API”. Give it a name, such as s3-presigned-url.
- Let’s first set up AWS Cognito. On the left, select “Authorizers” and on the top, click “Create” and “Cognito User Pool Authorizer”. Here, select the AWS Cognito pool you just created.
- Next, go to the “Resources” section on the left. Here, select the ”Actions” dropdown and create a new GET method.
- For integration type, choose Lambda. Select the region where your Lambda function exists and type in the name of the Lambda function you just created.
- You will get a popup saying that you are about to give API Gateway permissions to invoke your Lambda function: click OK.
- In the screen you see now, click on “Method Request”. There, click the edit icon next to “Authorization”. In the dropdown, select your AWS Cognito User Pool.
- We’ll need to enable CORS for API Gateway to accept our request. Select the ”GET” method that you just created in the list and in the dropdown, select “Enable CORS”. This will setup a new OPTIONS method and by default enables cross-origin requests from any domain. For now you can leave the defaults but keep in mind that it is better to only allow access from your own website.
- In the same “Actions” dropdown, select “Deploy”. Create a new deployment stage (such as “production”) and click “Deploy”. Take note of the API endpoint URL that is presented to you: we’ll need this in the next step.
We have now an HTTP endpoint that we can query to receive a temporary URL for uploading a file to our S3 bucket. Of course, to get this URL we need to make an authorized request and therefore, be logged in to AWS Cognito. In the next step, this all comes together in the form of the ReactJS application.
The ReactJS application
To get the application up and running, clone my GitHub repository. The application is developed with NodeJS version 6.10.3, though I see no reason later NodeJS versions should not work. The application is contained in the single App.js file. Though it’s better to split up your application into multiple ReactJS components and files, I put everything in a single file to keep it as concise as possible. At the top, find the three lines that contain the UserPoolId, ClientId and ApiGatewayUrl. Replace these with the values you jotted down in the previous steps.
With the root directory as your working directory, run npm install to fetch the dependencies and npm start to start the application using the create-react-app wrapper library. Your application will now load in a browser tab, showing a login screen. Time to login to AWS Cognito! First though, let me explain the general flow of the application:
- Lines 65-71. This is where the initial login will end up. Remember that the user you created in AWS Cognito received the status “FORCE_CHANGE_PASSWORD”? That’s what we’ll do first. We set the mandatory e-mail field with a bogus value and update the password through appending an X to the original password. Remember this if you login again after reloading the page as you’ll be logged out again. I’m setting the bogus e-mail and password because the purpose of this application is uploading a file to S3, not to work with the AWS Cognito Javascript SDK.
- Lines 28-34. This is where the successful logins end up and where we store the
accessTokenthat is required for making the authenticated HTTP request to API Gateway. We also set some additional state variables so that the UI will show the upload field. - Lines 76-84. Here, we configure the onDrop event, triggered when the user selects a file to upload. We’re using the react-dropzone library which makes it really easy to add upload functionality. As you can see in the code, we first go to API Gateway using the access token received from AWS Cognito. Then, we use that URL to do a PUT request against the S3 pre-signed URL. With that, we update the state variable so that we see the HTTP status code received from the the upload and can see it’s a success (or not).
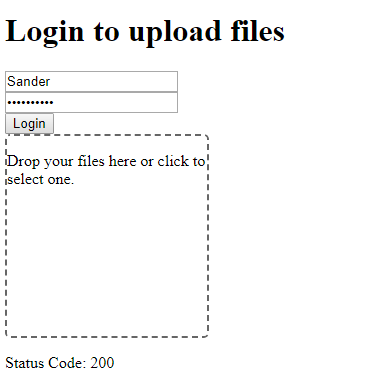
The rest of the code is pretty self-explanatory. We use the amazon-cognito-identity-js to communicate with AWS Cognito. At the bottom of the file is the HTML that builds the UI. Keep in mind that the application doesn’t store any state through reloading of the page. If you do so, you’ll have to login again. All in all, the application looks like this after having uploaded a file:
Conclusion
The only piece of functionality we really want to execute is the generation of the pre-signed URL of the Lambda function. Through using API Gateway we make this Lambda function available as an HTTP endpoint, and as a bonus we add AWS Cognito as a means of authentication. None of these services require any maintenance, nor cost any money if not used. This is a great way for creating such a simple functionality with minimal setup requirements and zero maintenance. Keep it in mind next time you need somewhere to execute a little piece of code!